Going Kosher: Day 1

Breakfast:

Boiled Eggs (2)
Bread and Butter
Coffee

Dinner (Lunch):

Potato Soup
Hungarian Goulash
Vegetables
Bread

Supper:

Pickled Herring
Fresh Fruit
Bread & Butter
Tea

I worked yesterday, so I did all of my meal prep the night before, carefully labeling Tupperware “M” and “D”  to take with me, organizing food in the fridge for my boyfriend.

As I cooked dishes for lunch, I kept encountering problems. I went for the vegetable peeler, then remembered that it was not kosher: it had been washed 100 times with sponges that had touched both meat and dairy.  My good knives and my cutting board were in the same boat, so I mangled vegetables with a butter knife over paper towels.

I only had one pot I could use for meat, so I could only cook one dish at a time:  the eggs for breakfast first, then the potato soup with chicken stock, then noodles for the Hungarian goulash, then the meat.

The potato soup recipe was a simple one I knew by heart: one stalk celery, one carrot, one onion.  Softened in Canola Oil, although I wished I had schmaltz, the more period appropriate, tastier cooking oil.  Then, salt and pepper, two large potatoes, and chicken stock bought from the kosher aisle at Gristede’s. Simmered until the potatoes are done; delicious.

For the Hungarian Goulash, I referenced an historic recipe from The Neighborhood Cook Book (1912):

I had difficulty finding kosher beef.  I wandered the Lower East Side, caught in a freezing rainstorm with a broken umbrella.  I searched for kosher butcher shops Google said still existed, but were either long closed or somehow hidden from my goy eyes.  I began to find myself on streets where the only writing was in Yiddish, on some forgotten corner that didn’t know the Jewish population had moved on fifty years ago.  I asked around.  I was told to go to Brooklyn.  But something stopped me from crossing the bridge in to Williamsburg: there, you can find the Lower East Side of 100 years ago.  There I was too different, too foreign.  I was too scared to find what I needed there.

So, shivering and soaked with rain, I ducked into a grocery store that I knew would have a kosher section in the back.  Next to a shelf of Hebrew National salamis were a few rows of chicken and turkey labeled “kosher.”  I settled on ground turkey for my goulash instead of beef.

I followed the recipe, tasting it after it has been simmering a time with the tomato.  It was bland and terrible and lacking the deep red color that I know goulash should have.  I have attachments and memories of this dish from my childhood: the Catholics that ended up in my hometown of Cleveland came from the same parts of the word as the Jews that stayed in New York.  I tripled the paprika.  Then, I remembered a common theme of eastern-European cooking: sweet and sour.  I threw in a tablespoon of vinegar and a packet of Sugar in the Raw, and let it simmer over low.

Stirring my pot of goulash, I felt like a jewish housewife.  All the steps, the careful cleaning.  Meat sponge for the knife that cut the onion for the soup.  Dairy sponge for the knife that buttered the Bialy for dinner. So careful. So thoughtful.

How did it all taste?  More on that later today.
Diets: Going Kosher

I work three days a week at the Lower East Side Tenement Museum as an educator.  I guide visitors through tiny, dark apartments.  Small spaces that 100 years ago housed families of eight or more.

Standing in the kitchen (the one with no running water, no refrigeration, and limited storage space), someone always asks with a sense of awe: “How did they do it?”

Not just how did they raise a family, do the laundry, run a business or the myriad of tasks that took up a tenement dweller’s day.  What they’re really asking is “How did they keep Kosher?”  How did the millions of Jewish immigrants that poured into the Lower East Side around the turn of the century manage to preserve the traditions of their faith in the airless kitchens of a five floor walk up?

“I have no idea,” I answer. “But I’m going to find out.”

This week, I’m following kashruth.  In my four floor walk up in Queens; in my modern kitchen; and only for three days.  A drop in the bucket compared to the daily ins and outs of the Jewish housewife 100 years ago (or the contemporary Orthodox housewife in Williamsburg, Brooklyn).

The menu I’ll be following is a 1914 daily menu from the Kosher Kitchen at Ellis Island.  I came across the menu in Jane Ziegelman’s book 97 Orchard, but the original can be found in the Ellis Island Archives.  The Kosher Kitchen was opened in 1911 after advocacy by the Jewish aid organization HIAS.  Imagine spending eighteen days on a steamship from Russia, where you may or may not have been provided with Kosher food, or may have had to prepare it yourself.  You arrive in America to another plate of unkosher food.  Exhausted, malnourished, and vulnerable to disease, you were at risk for deportation on medical grounds.  The Kosher Kitchen, free to immigrants beings detained at Ellis Island, was a huge step.

Why is kosher kept?  The basis of kosher is derived from Exodus 23:19: “Thou shalt not boil a kid in it mother’s milk.”  Meat and dairy must never come together.  Everything else is referred to as “parve,” and can be eaten with with meat or dairy.  Utensils and dishes must be kept separate for each, as well as dish rags, cutting boards, etc.  If one touches the other, the utensils are “traif”, meaning they can’t be used for either.  There are laws regarding how long you must wait to eat dairy after meat (anywhere from 4-12 hours depending on your rabbi) and vice versa.  There are laws regarding what animals you can eat and what cuts of meat: chickens, cows, fishes.  No rabbits. No Shellfish.  They must be slaughtered in a certain way and all the blood must be drained before consumption.

100 years ago, Jewish immigrants were divided into two categories: those attempting to preserve their traditions in America, and “Oyster Eaters,” those becoming more liberal and more “American” in their observances.

There’s more to it than that.  Nuances and laws I’ll cover over the next few days (or you can brush up at jewfaq).

As the daughter of a Catholic, I viewed kosher like a Catholic would: this is a thing you do and if you don’t do it, you’ll burn in hell.  Not so.  As my colleague Judy explained it: “This is the thing you do to show your are different than your neighbors.  It’s the thing you do to show you are Jewish.”

So for the next three days, my dairy will not touch my meat.

Origin of a Dish: Chocolate Chip Cookies

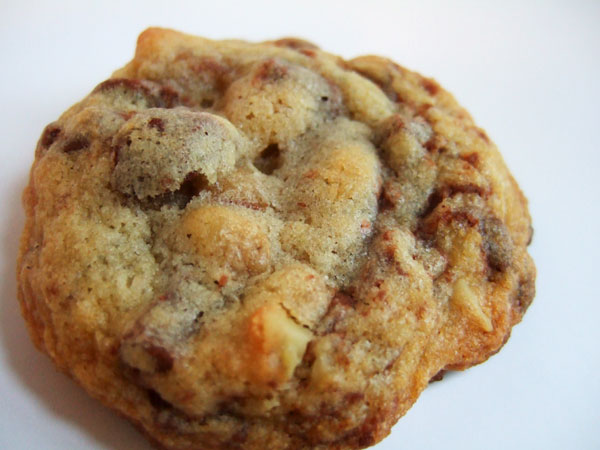
A chocolate chip cookie, baked from the original recipe.

During my recent experiments with chocolate, I got curious about the origins of the ultimate American chocolate dessert:  The Chocolate Chip Cookie.  Keep reading for the original recipe, which, in my opinion, is the perfect cookie.

Ruth Wakefield  is credited for the invention of the chocolate chip cookie at her Toll House Restaurant Whitman, Mass., “…a very popular restaurant that featured home cooking in the 1930s. The restaurant’s popularity was not just due to its home-cooked style meals; her policy was to give diners a whole extra helping of their entrées to take home with them and a serving of her homemade cookies for dessert.” (wikipedia)

The legend of the cookie’s creation goes like this: “Wakefield is said to have been making chocolate cookies and on running out of regular baker’s chocolate, substituted broken pieces of semi-sweet chocolate from Nestlé thinking that it would melt and mix into the batter. (wikipedia)”  I don’t believe this explanation.  Baker’s chocolate doesn’t magically melt into cookie dough, so if Wakefield knew how to work with baker’s chocolate, she would know that a semi-sweet Nestle bar would behave the same way. The legend makes her seem like a foolish little lady that made a silly mistake that magically turned into something wonderful.  I think she was actually an extremely talented cook with a brilliant idea.

Whatever the truth is, she sold her idea to Nestlé in exchange for a lifetime supply of chocolate (or so the story goes; I think she was probablly a smarter business woman than that).  Wakefield’s cookie recipe was subsequently printed on the back of all Nestle’s chocolate bars.  At first, Nestle included “a small chopping tool with the chocolate bars, but in 1939 they started selling the chocolate in chip (or morsel) form.” (wikipedia).

Chocolate chip cookies are The Official Cookie of the Commonwealth in Massachusetts: http://www.malegislature.gov/Laws/GeneralLaws/PartI/TitleI/Chapter2/Section42

Wakefield released a cookbook in 1936, Toll House Tried and True Recipes, which features the original chocolate chip cookie recipe as “Toll House Chocolate Crunch Cookies.”  The recipe, as well as the rest of the cookbook, can be found online here.  Below, here’s the same recipe from the April 26, 1940 Chicago Tribune (from the food timeline)

Here’s a new cookie that everybody loves because it is so delicious, so different and so easy to make. With each crisp bite you taste a delicious bit of Nestle’s Semi-Sweet Chocolate and a crunch of rich walnut meat. A perfect combination. Here’s a proven recipe that never fails. Try it tomorrow.
1 cup butter
3/4 cup brown sugar
3/4 cup granulated sugar
2 eggs, beaten whole
1 teaspoon soda
1 teaspoon hot water
2 1/4 cups flour
1 teaspoon salt
1 cup chopped nuts
2 Nestle’s Semi-Sweet Economy Bars (7 oz. ea.)
1 teaspoon vanilla
Important: Cut the Nestle’s Semi-Sweet in pieces the size of a pea. Cream butter and add sugars and beaten egg. Dissolve soda in the hot water and mix alternately with the flour sifted with the salt. Lastly add the cholled nuts and the pieces of semisweet chocolate. Flavor with the vanilla and drip half teaspoons on a greased cookie sheet. Bake 10 to 12 minutes in a 375 degree F. oven. Makes 100 cookies. Every one will be surprised and delighted to find that the chocolate does not melt. Insist on Nestle’s Semi-Sweet Chocolate in the yellow Wrap, there is no substitute. This unusual recipe and many others can be found in Mrs. Ruth Wakefield’s Cook Book–“Toll House Tried and True Recipes,” on sale at all book stores.”

A modernized version of this recipe can be found on the Nestle website, here.

The biggest problem in recreating the original recipe is the chocolate; I felt that chopping up a candy bar was an important part of the original process.  But nowadays, Nestle only makes semi-sweet morsels, not bars.  Nestle still makes milk chocolate bars, which I later found at Economy Candy, but for my first attempt at the recipe I had to use a stack of Hershey’s milk chocolate bars.

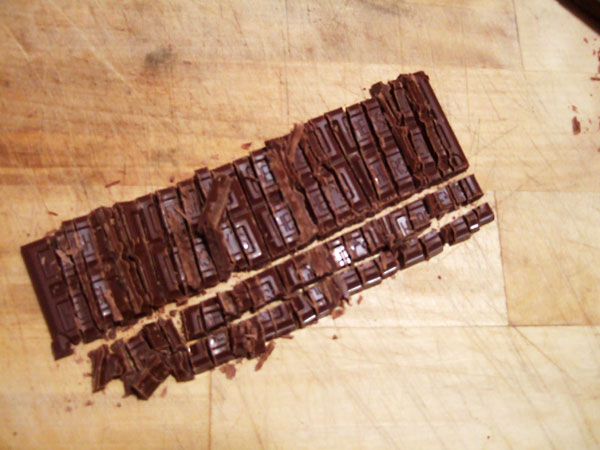
It was much easier to cut up the chocolate bar that I anticipated.  The recipe specified the pieces should be “the size of a pea,” and I tried to remain faithful to that.  I used a large knife and the job was done in short order and with little effort.  The chopped chocolate smelled seductive and got me thinking: why are we restricting ourselves to the bags of chocolate chips in the baking aisle, when there is a bevvy of delicious, interesting chocolate bars available?  Hachez, a German company, makes dark chocolate bars infused with orange, blackberry, mango/chili, and strawberry/pepper.  Mast Brothers Chocolate, in Brooklyn, features a variety of carefully crafted dark chocolate bars of single origin cocoa beans, as well as bars sprinkled with sea salt and ground coffee.  Put that in your cookie dough and bake it.

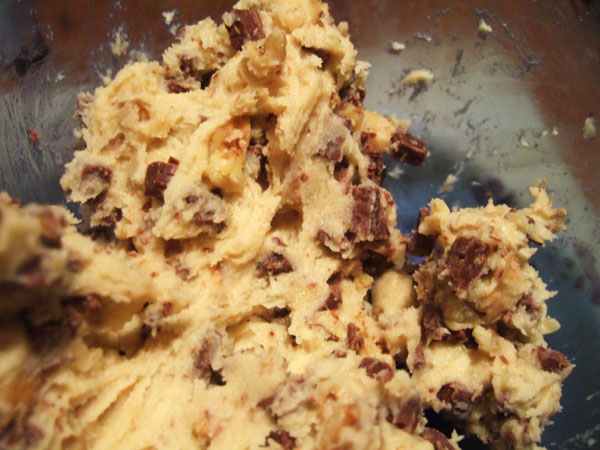
The dough mixed quickly and easily; it was baked and in my mouth in less than an hour.  The first bite of warm, melty cookie made me think of s’mores and brought back a flood of childhood memories.  The cookies were agreed to be perfect by all that sampled them: the best ratio of chocolate to nuts to everything in between.  Everyone was shocked to learn it was the first chocolate chip cookie recipe and wondered why it was ever changed.

For more on chocolate cookies, check out this recipe for one of the first known uses of chocolate in baking.

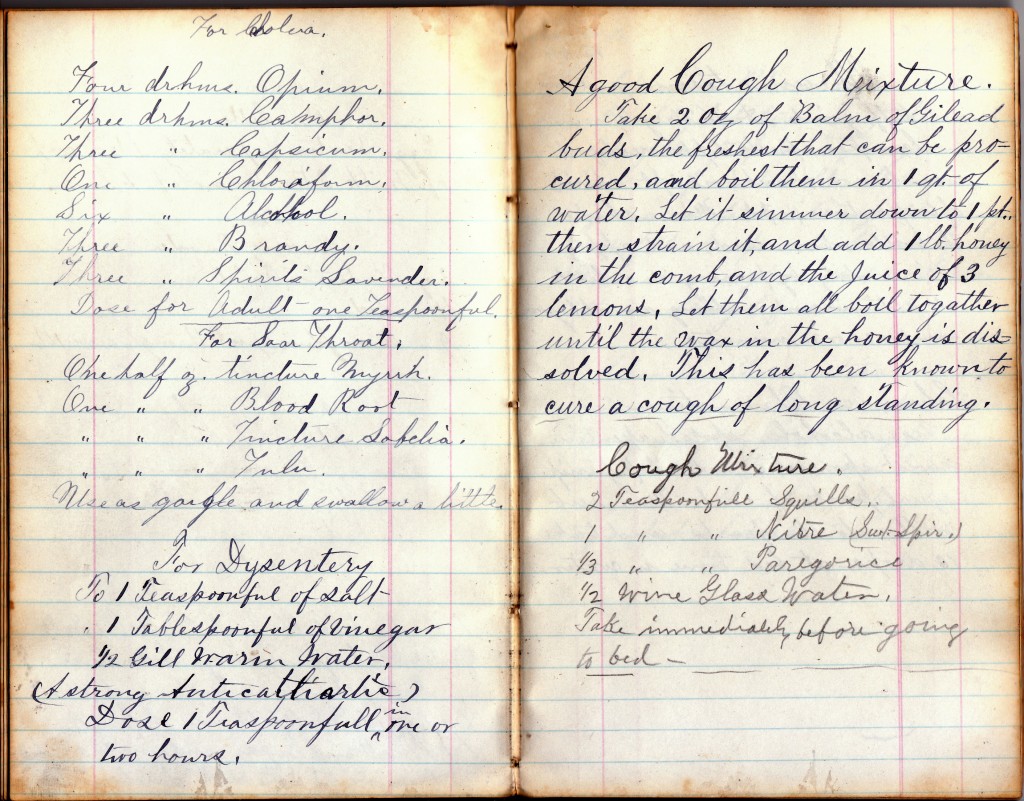
The Gallery: For Cholera. For Dysentery.

These pages come from a handwritten, leather bound journal that was given to me for Christmas.  It belonged to a friend’s grandmother; the inside cover is signed “Annie S. Bush” and “Warren Koons.”  According to my friend, Warren is a relation of her grandmother, and Annie Bush was Warren’s first wife.  She was born June 20, 1854 and died Sept 1, 1883.  I suspect Warren picked up the book after his wife died (her signature appears to be written earlier) and wrote in it until his untimely death in 1910.  Warren and his second wife were brutally murdered by their son-in-law: read the New York Times article here.

In addition to home remedies like these, the book is full of beer and wine recipes; baked good reciepts from Annie; and a study of wild mushrooms.  I’ll be sharing more pages over the next week.

Chocolate Delight: Tunnel of Fudge Cake

Tunnel of Fudge cake bakes up tall, with a glossy, brownie-like crust.  Break pieces off and eat it; no one will know.

I’m wrapping up Chocolate Delight week with a bang: a cake that has a built-in Tunnel of Fudge.

The legend of this cake was related to me by Jessica, the author of Pictures of Cake.  This cake won second place at the 1966 Pillsbury Bake-off, losing to ‘”golden gate snack bread,”‘  a yeast bread made with instant flour, processed cheese spread, dry onion soup mix and butter.(source)”  Blech.  The snack bread has been long forgotten, while Tunnels of Fudge lives on.

The Tunnel of Fudge cake was a technical revolution: first, it produced a moist cake with a fudgy, uncooked center, perhaps the ancestor of the modern Molten Chocolate Cake.  Second, it used a Bundt pan.  For a little more information on that, take a look at Jessica’s invitation to her ToF Cake party:

Third, this cake is quite possible the least healthy thing I have ever made.  It contains approximately 60 eggs, 1 millions pounds of butter, and 20 cups of sugar.  Originally, it was made with a pre-packaged, powdered frosting mix called Double Dutch Fudge Buttercream.  

Tunnel of Fudge Cake(original recipe)
1 1/2 cups soft Land O’ Lakes Butter
6 eggs
1 1/2 cups sugar
2 cups Pillsbury’s Best Flour (Regular, Instant Blending or Self Rising*)
1 package Pillsbury Double Dutch Fudge Buttercream Frosting Mix
2 cups chopped Diamond Walnuts

Oven 350° [ed. 350 F / 175 C]
10-inch tube cake

Cream butter in large mixer bowl at high speed of mixer. Add eggs, one at a time, beating well after each. Gradually add sugar, continue creaming at high speed until light and fluffy. By hand, stir in flour, frosting mix, and walnuts until well blended. Pour batter into greased Bundt pan or 10-inch Angel Food tube pan. Bake at 350° for 60 to 65 minutes. Cool 2 hours, remove from pan. Cool completely before serving.

Note: Walnuts, Double Dutch Fudge Frosting Mix and butter are key to the success of this unusual recipe. Since cake has a soft fudgy interior, test for doneness after 60 minutes by observing dry, shiny brownie-type crust.

***

After the frosting mix was discontinued, Pillsbury developed a modern recipe which you can find here. This is the recipe I baked from, with a few minor changes that I will include below.

***
Tunnel of Fudge Cake, REMIXXXX

Adapted from Pillsbury.com and
The 17th Annual Pillsbury Busy Lady Bake-Off Cookbook, 1966

2 3/4 cups granulated sugar
1 3/4 cups  (2 and 3/4 sticks) butter, at room temperature
6 eggs
2 1/4 cups flour
3/4 cup unsweetened cocoa
1/4 tsp salt
2 cups chopped walnuts (the recipe notes that “Nuts are essential for the success of this recipe.” ha!)

1. Grease a bundt pan and dust with additional cocoa powder.  Preheat oven to 350 degrees.

2. In a large bowl, whisk together flour, cocoa powder, and salt.  Set aside.

3. Cream together sugar and butter until light and fluffy, about three minutes at medium speed.  Add eggs one at a time, mixing thoroughly after each one.

4. With mixer on low, slowly add dry ingredients.  Scrape bowl, then mix until combined.

5. With a spatula, fold in walnuts.  Spoon batter into bundt pan; bake 45 minutes or until top has a dry, shiny brownie-type crust.  Cool upright in pan on wire rack 1 1/2 hours. Invert onto serving plate; cool at least 2 hours.

***

Can someone please tell me how to get a cake out of a bundt pan?  Mine always comes out in broken, shameful pieces.

When I cut my cake, it wasn’t puking out fudge like in the 1966 photo; but, running down the middle was a dense spine of goopy fudgeness.  My oven tends to run a little hot, so I think the cake was slightly over-baked: ten minutes less would have allowed a much thicker fudge vein.

The cake was good; the walnuts were a nice break from what would have been a total chocolate assault.  But the cake also had a greasy mouth-feel thanks to the million pounds of butter.  And it’s sooooo swweeeeeet.  I even made it with a cup less sugar than the Pillsbury recipe calls for.

I don’t know.  I’d be curious to have more people give this bizarre chocolate cake a whirl and tell me what you think of the final results.

Chocolate Delight: Chocolate Wafers

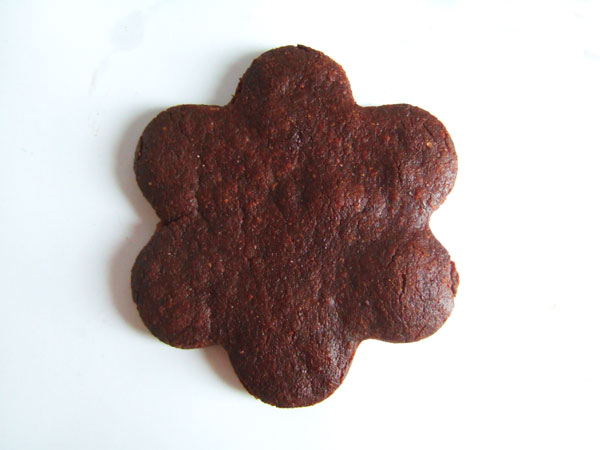
Chocolate Wafer cookies; from Gourmet, February 1950.

Faced with the task of consuming chocolate, I decided to reference a book that I had gotten for Christmas: The Gourmet Cookie Book: The Single Best Recipe From Each Year 1941- 2009. It’s a cool anthology that reflects the changing tastes of the last 70 years.  I wanted a rich, chocolately cookie, and I found this recipe for Chocolate Wafers from Valentine’s Day, 1950:

“Chocolate Wafers: Good cooks were pleasing their menfolks with chocolate cakes back during the early settling of the New England colonies…Modern ways are upon us, atom bombs bedevil our dreams, standardization of taste haunts our mealtimes–but chocolate is still chocolate.”

Intense!  But also inaccurate–chocolate cake recipes didn’t start appearing until the later half of the 19th century.  Just FYI.

***
Chocolate Wafers

From Gourmet magazine, Feb 1950
As Reprinted in  The Gourmet Cookie Book: The Single Best Recipe From Each Year 1941- 2009

3/4 cup Butter, room temperature
1 1/4 cups Sugar
1 tb Rum Extract (I didn’t have any, I used rum)
1 Large Egg
1 1/2 cups Flour
3/4 cup Unsweetened Cocoa Powder
1 1/2 tsp Baking Powder
1/4 tsp Salt

1. Sift together flour, cocoa, baking powder and salt. Set aside.

2. Cream butter.  Add sugar gradually and cream together until light and fluffy.

3. Add egg and rum. Beat thoroughly

4. With mixer on low, gradually add dry ingredients, mixing thoroughly after each addition.

5. When completely mixed, refrigerate overnight.

6. Roll out dough 1/8th of an inch thick; cut into fun shapes; bake in a 375 degree oven for 6-8 minutes.

***

This recipes mixes up very quickly, but the dough is hellish to work with.  It was somehow both dry and crumbly and extremely sticky.  It did allow me to use some of my vintage cookie cutters as well as a vulgar cutter my roommate gave me for Christmas.

The cookies are tasty.  I liked the texture best when they first came out of the oven: they were really crispy and flaky.  They got a little more dense as they cooled, but still very good.  If I was going to make an artisanal Oreo, I would use this recipe.

These cookies are getting shipped off to Washington DC for a friend’s very belated birthday present.  Not the vulgar ones, though.  The balls got a little burned.

Chocolate Delight: Royal Hot Chocolate

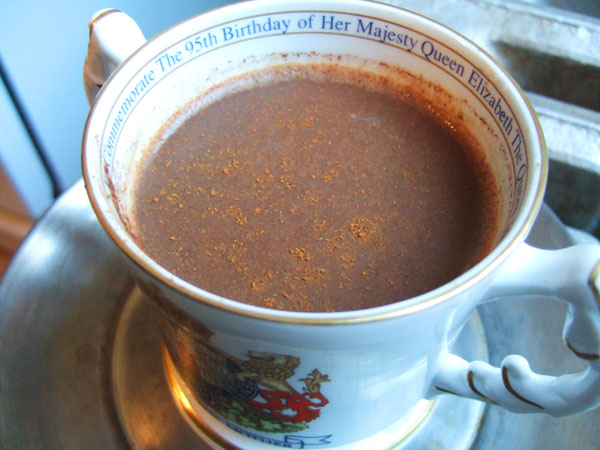
Royal Chocolate in a royal cup.

It’s cold in New York.  Reaul cold.  At the end of a long day, I needed a little pick me up.  So I cracked a cookbook my Aunt had given me for my birthday, a 1971 reprint of a 1934 Hershey’s Cookbook.

The book has been “adapted to a modern kitchen,” so that could mean anything in terms of reinterpretations of the original recipes.  But regardless, I do enjoy cooking up some 70s kitsch.

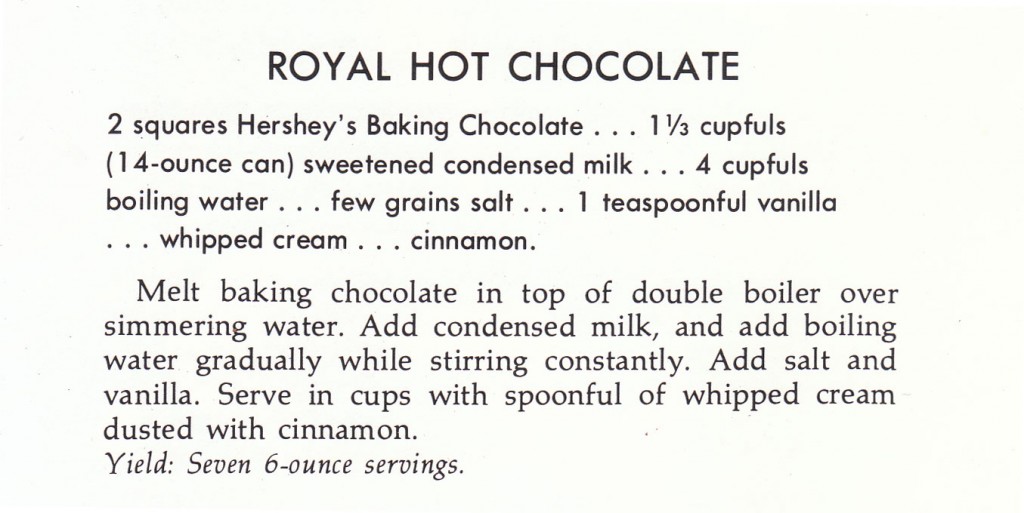
In the “Beverages” section, I came across this recipe for Royal Hot Chocolate.

Sounds so decadant!

***
Royal Hot Chocolate

From the 1934 Hershey’s Cookbook (1971 expanded and updated edition)

2 squares Unsweetned baking chocolate
1 14 ounce can sweetned condensed milk
4 cups boiling water
Pinch salt
1 tsp vanilla
Whipped cream and cinnamon (optional)

1. Melt baking chocolate in a double boiler: a glass bowl set over a saucepan of boiling water will do just fine.

2. Add condensed milk, then GRADUALLY add boiling water while whisking vigorously.  Heed this advice; I didn’t, and dumped the water in.  Despite some vigorous whisking, I ended up with grainy hot chocolate.  And the water must be BOILING, or else you’ll end up with a lump of unmelted chocolate and water.

3. Add salt and vanilla, and serve, with whipped cream and a dusting of cinnamon if desired.

***

Since it is Royal Hot Chocolate, I served it up in the royalest mug I had: A double-handled cup commemorating the Queen Mum’s 95th birthday.  When I first sipped the chocolate, I wasn’t bowled over.  But the more I drank, the more I realized how smooth it was.  How chocolately.  And not too sweet.  It was perfect in every way.  In a feat of decadence, I drank this hot chocolate while taking a hot shower.  I feel Awesome.

Chocolate Delight: Mahogany Cake

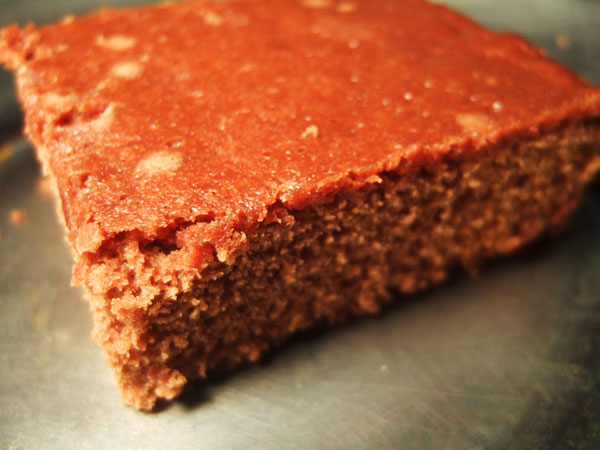
Mahogany Cake: cocoa powder and brown sugar.

Have you ever read A Cake Bakes in Brooklyn?  You should.  Some months ago, the author loaned me a book by a mysterious cake maven named Mrs. Osborne.  Read more about this fascinating woman, with a unique perspective on how to bake a cake, here.

I’ve baked one recipe from Mrs. Osborne’s book, a fairly unsuccessful Puff Cake.  But another recipe captured my attention, a brown sugar and chocolate confection called Mahogany Cake.

***
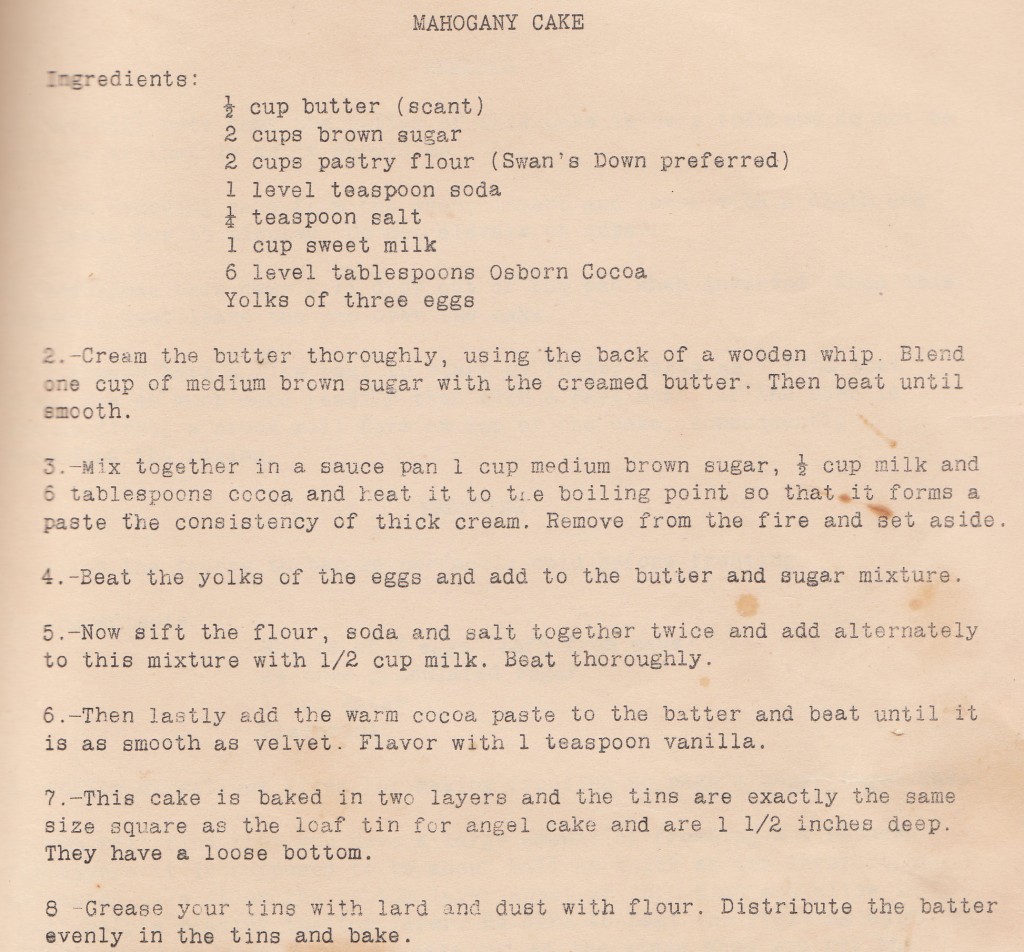
Mahogany Cake
From Mrs. Osborne’s Cakes of Quality, by Mrs. Grace Osborne, 1919.

I didn’t have the pans she wanted, so I baked it in a regular rectangular cake pan, which I buttered and dusted with cocoa powder.  The milk, sugar and cocoa powder comes to a quick boil, so watch out for that.  After I mixed the flour in, the batter was super smooth; when the melted chocolate was added, it was very velvety, just like Mrs. Osborne promised.  Don’t forget the teaspoon of vanilla at the end; she doesn’t list it in the ingredients.

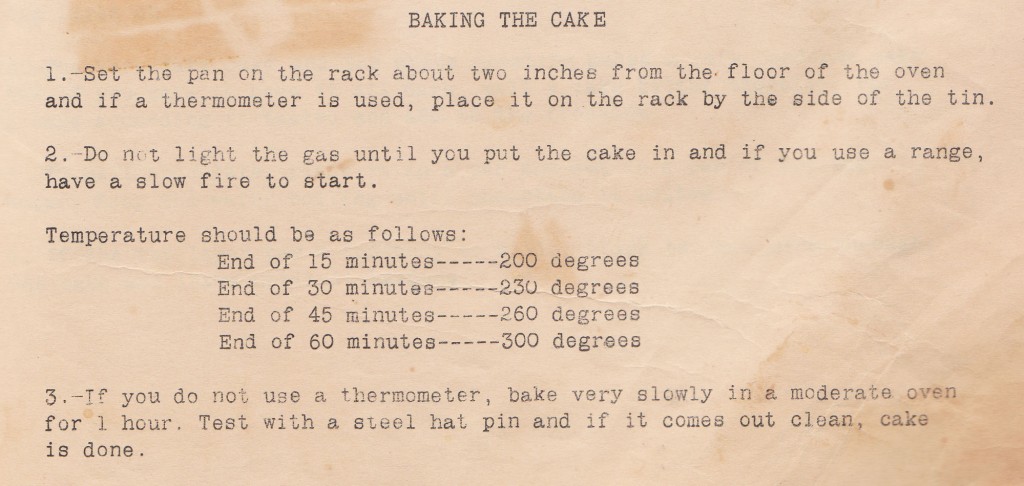
When completed, the batter tasted like hot fudge.  The cake showed promise.  But here comes round two, Baking the Cake.  Pay careful attention, it is detailed:

I ALWAYS managed to fuck this part up, because I forget to reset the timer.  That’s how the Puff Cake got overcooked and tough last time; this time I forgot to set the timer after 230 degrees.  So I went from 230 to 300 in the last 15 minutes. Grr.

The  results: the cake had a nice fudgy flavor.  I actually do not like chocolate cake (Short story: my mother was a prize baker, once she was testing a million chocolate cake recipes, I ate too much cake and puked.  Haven’t been able to stomach it since.)  but the flavor was rich enough I didn’t find it off putting.  But the texture was not great: although the top was most, the center and bottom of the cake was really dry and unpleasant.  That’s the same problem I had when I made the puff cake.

Mrs. Osborne’s ridiculous baking methods seem like they’ll be worth the trouble; they stink of some long forgotten baking secret.  But in reality, the long, low bake time seems to dry the cakes out.  Thumbs down, Mrs. O.

Cookie Week: Maple Sugar Cookies

These cookies: they are AMAZING.   You will become addicted to Maple Sugar Cookies.  You will NEED them.
The original recipe can be found here, in the 1909 edition of the Good Housekeeping Women’s Home Cookbook.  I love maple– not maple flavoring, but real maple sugar.  The cookies use 1 cup granulated maple sugar plus 1 cup sugar; you can play with the proportions for a less sweet combo, but the general consensus amongst my taste-testers was that the sugar level was good.  Rolled out thin and cut into shapes, these cookies bake up perfectly crispy, with a melt-in-your mouth buttery texture, and with an absolutely ideal maple flavor.
Maple sugar, by the way, can be purchased off the King Arthur Flour website.  8 oz. is enough to make 1.5 recipes.  I had never seen ground maple sugar before–it’s powdery and dusty and not at all what you’d expect.  But a few dollops of maple flavoring are NOT a good substitution.  If you want to make these, get the real thing.  It’s imperative.
Out of all the cookies I baked this season, these cookies were the hands-down favorites.  Make them today.  It will divide your life into the time before Maple Sugar Cookies and after.
***
Maple Sugar Cookies
From The Good Housekeeping Woman’s Home Cook Book. Arranged By Isabel Gordon Curtis, c1909.
Recipes adapted for the modern kitchen by Karen Lohman.
(Makes 8 dozen two-inch cookies.)
1 cup (2 sticks) unsalted butter, at cool room temperature
1 cup granulated sugar
1 cup granulated maple sugar (purchase here)
2 large eggs
1 tsp. vanilla extract
3 ½ cups all-purpose flour, spooned into cup and leveled
2 tsp. baking powder
1/4 tsp. salt
1. Preheat oven to 375°. Adjust rack to middle position. Line cookie sheets with parchment or lightly grease.
2.Whisk together flour, baking powder, and salt.
3. Cream butter and sugar with an electric mixer at medium speed until light and fluffy, two minutes.
4. Add vanilla and eggs, one at a time, beating until well combined, scraping down bowl after each addition.
5. Stir in ½ of the flour mixture just until combined. Do not over mix. Stir in the rest of flour mixture.
6. Chill dough until firm, 2-4 hours, or overnight.
7. Work with one quarter of the dough at a time. Return unused portion to refrigerator. Generously flour pastry board and rolling pin. Roll dough 1/8 inch thick, checking frequently to be sure dough is not sticking.
8. Cut with a shaped, 2-inch cookie cutter, dipped in flour. Place one inch apart on baking sheet. Bake at 375° for 9-10 minutes, until deep golden brown around edges. Cookies are fragile. Cool 3 minutes on baking sheets before moving to cooling rack.
***
By the way, Four Pounds Flour is two years old!  Thank you friends, old and new, for continuing to encourage me to write.  The blog has grown so much in the past year and I have loved every moment.  Writing here has changed my life; I hope, at least, it has been fun for you, too.